These are genuine historical Control UI test screenshots, cropped and numbered for explanation. They show an older six-step Wizard, whereas the current product flow is Connect → Sample & Record Selection → Destinations → Route Processing → Deploy. Follow the current UI’s sequence, not the old step numbering visible inside these captures. Screenshots are not proof of delivered events.
Before you start: use connector-specific guides to prepare official API docs, least-privilege credentials, sanitized samples and a reachable Destination.
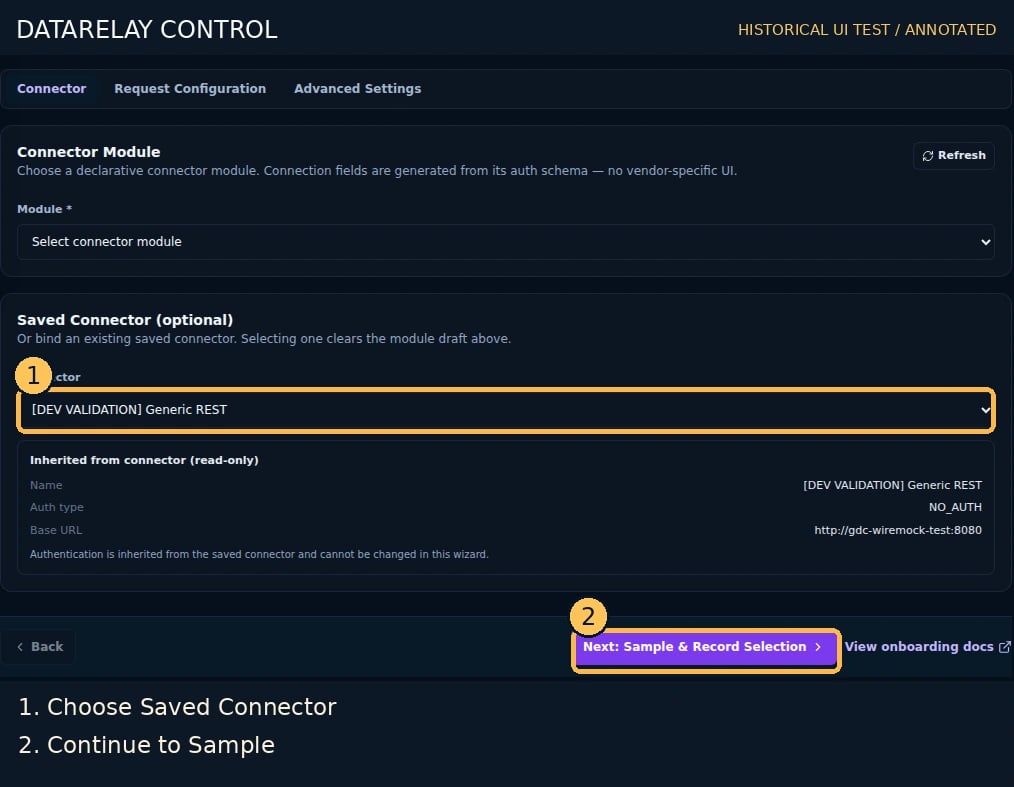
Create the Connector first, then select it under Connect. Verify the real Vendor/Source values.Figure 1. Selecting an existing Connector. ① Select your saved Connector (Generic REST is a test example). ② Continue to Sample. The Connector tab is already active.
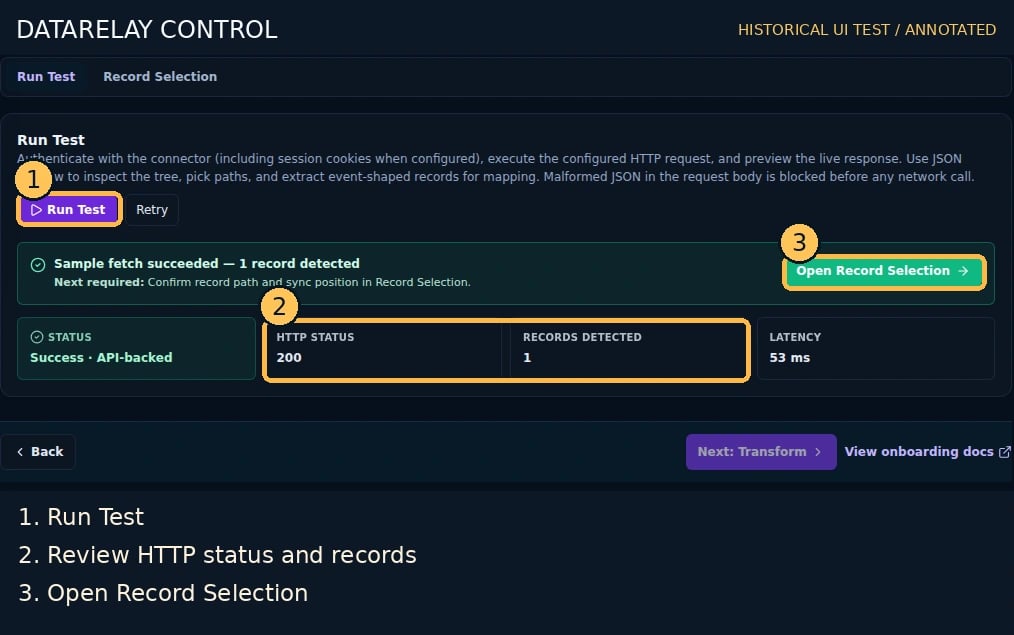
Use Run Test to fetch samples and inspect status/record count. A successful test does not auto-confirm the record path.Figure 2. Testing collection and record count. ① Run Test → ② verify HTTP status and extracted record count → ③ open Record Selection. An HTTP success is not proof of Destination delivery.
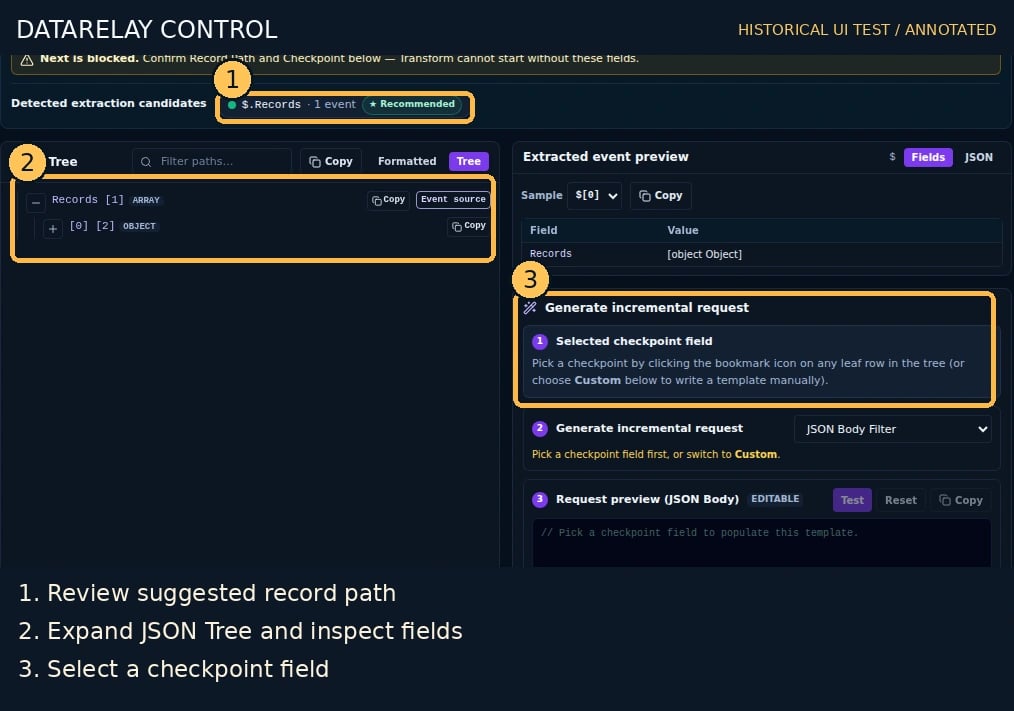
Select the true event array in JSON Tree, then a reliable checkpoint field. Confirm suggestions; do not accept them blindly.Figure 3. Choosing record path and checkpoint. ① Review the suggested Record Path, ② inspect actual fields in JSON Tree, ③ select the Checkpoint Field. This capture shows the not-yet-confirmed state.
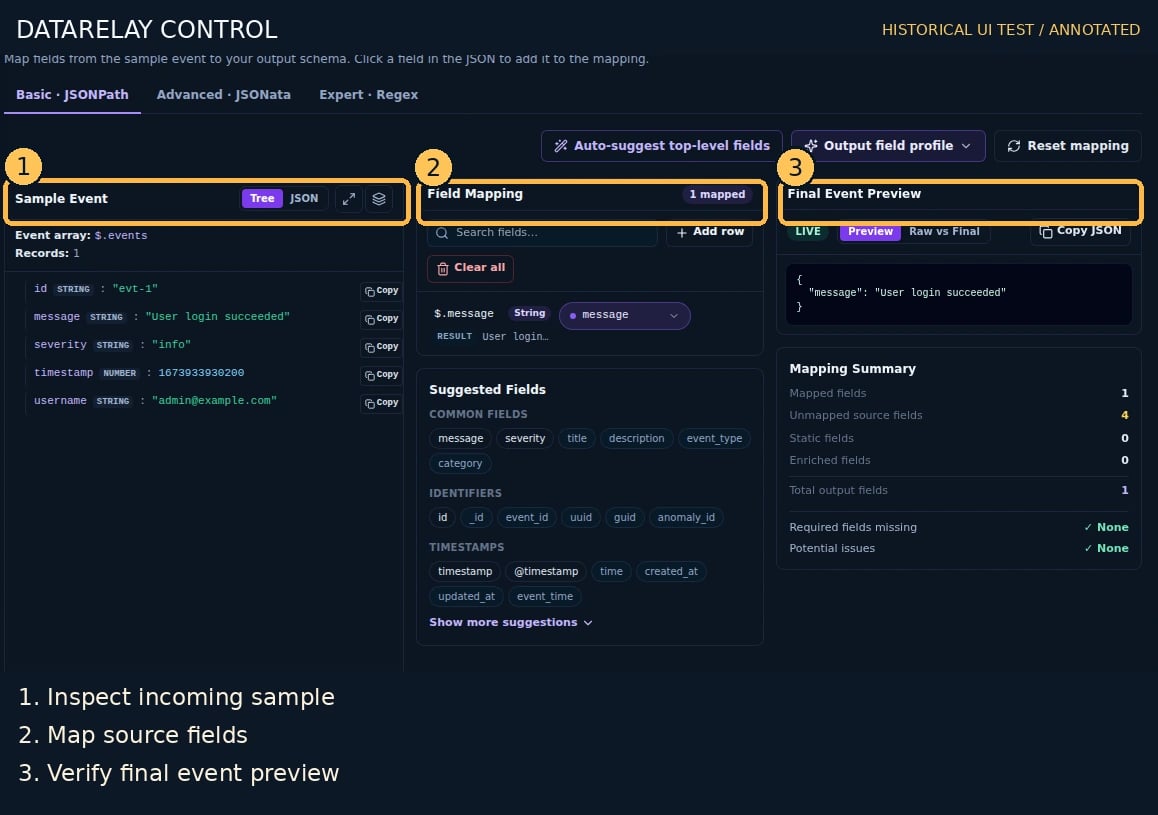
Compare Sample, Mapping and Preview in Route Processing / Transform. Configure Route differences after selecting Destinations.Figure 4. Mapping an event to output fields. ① Inspect the source sample, ② configure Field Mapping, ③ compare Final Event Preview. A preview does not prove real delivery.
If required, use Add field → Static Value. Close the menu and verify the field appears in Preview.Figure 5. Adding a custom output field. ① Select Add field, ② choose Static Value, then ③ close the menu and verify the new field in Final Event Preview.
If NEEDS ATTENTION appears, use Edit for Data/Records, correct the problem and re-check readiness.Figure 6. Resolving a blocked deployment. ① Read NEEDS ATTENTION, ② use Edit on Data/Records to fix required inputs, ③ stop while the deployment button is disabled.
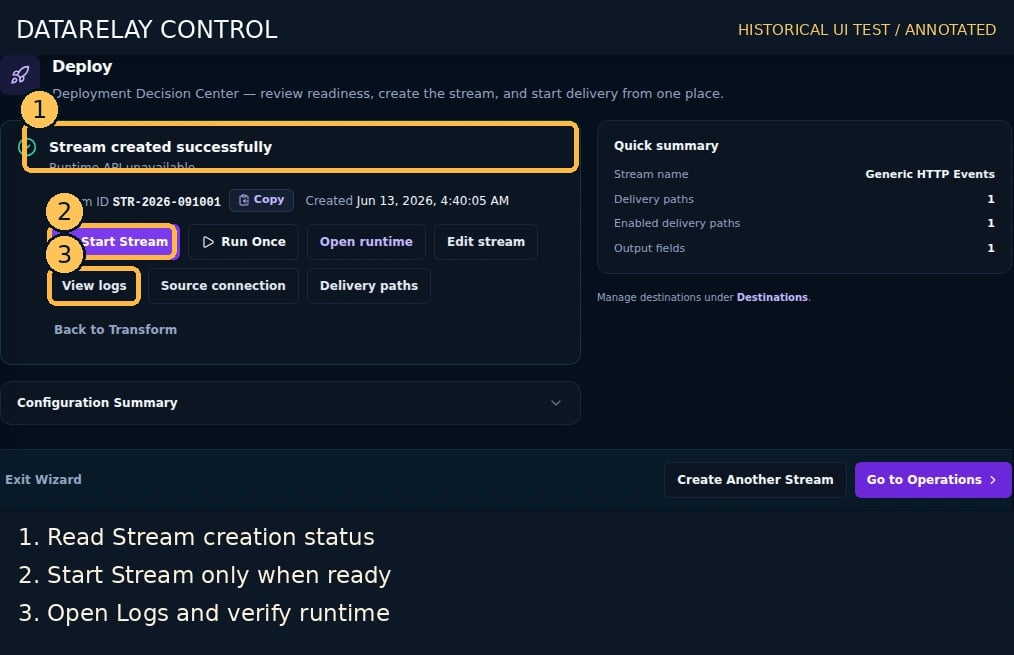
After Stream creation, use Start Stream and View logs to confirm execution. This capture explicitly says Runtime API unavailable.Figure 7. Start and verify a newly created Stream. ① Review Stream creation, ② use Start Stream only when runtime is available, ③ open View logs to verify execution. This historical capture says Runtime API unavailable.
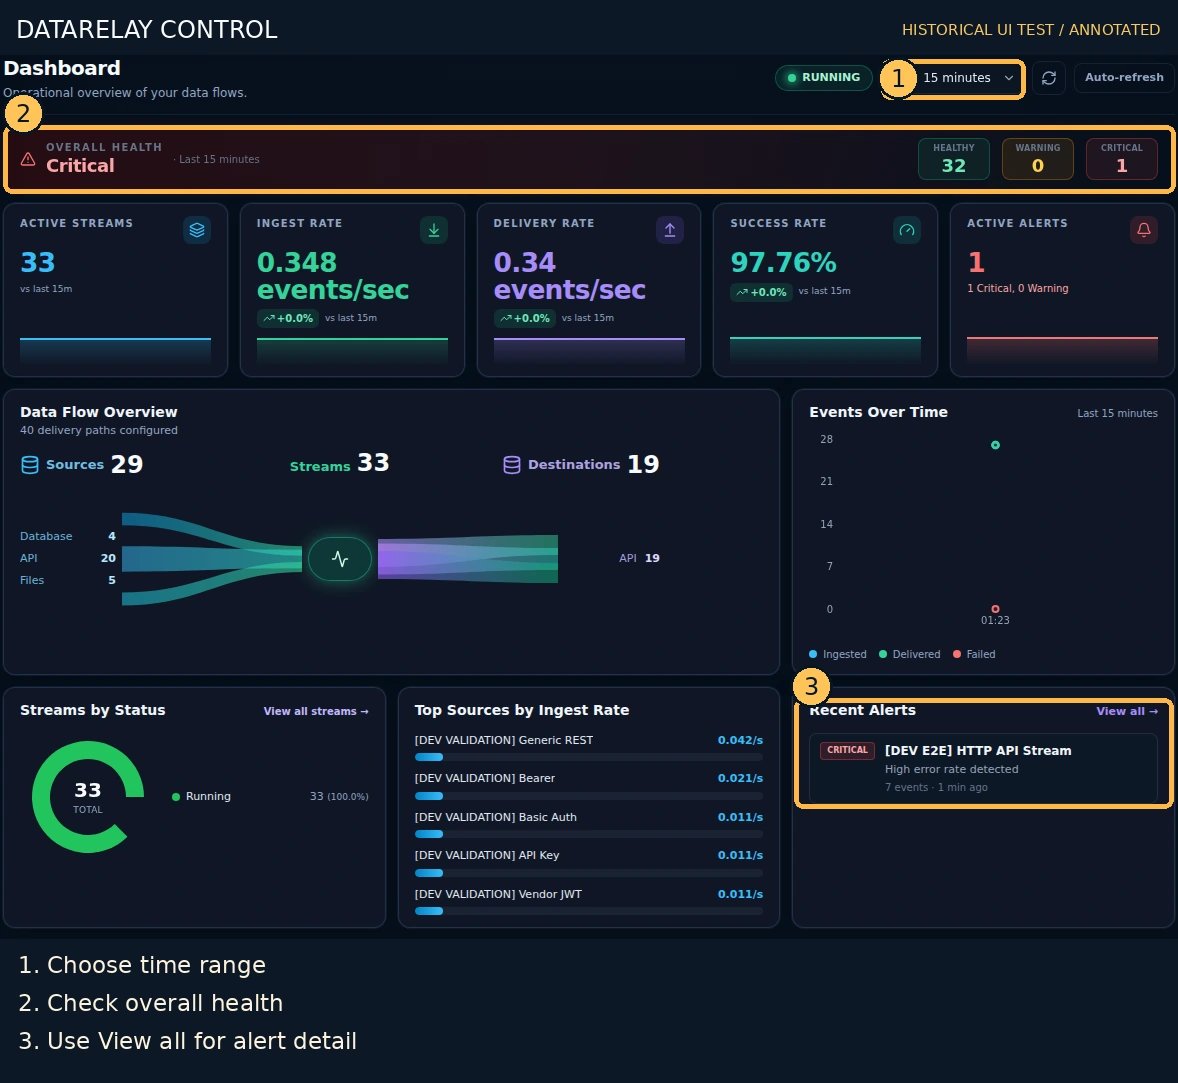
Inspect dashboard window, Health and Alerts; validate actual delivery through Route Logs and receiver data.Figure 8. Beginning an investigation on Dashboard. ① Set the time window, ② inspect Health/Critical, ③ use Recent Alerts for context. Verify the root cause in Streams, Routes and Logs.
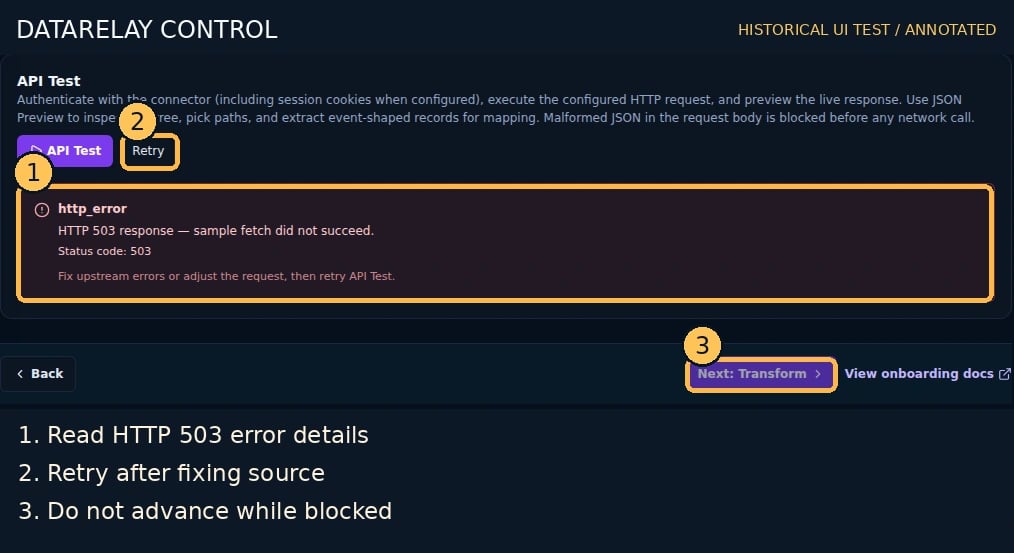
This is a Source API Test failure, not a Destination error. Check vendor API status and configuration before retrying.Figure 9. HTTP 503 during Source API Test. ① Read the HTTP 503 error, ② repair the source and Retry, ③ do not proceed while blocked. This is a Source API Test failure, not a Destination failure.
Use Resume draft to continue retained settings. Only choose Start fresh when you intend a new configuration.Figure 10. Resuming a saved Wizard draft. ① Select Resume draft to continue existing settings or ② Start fresh for a new configuration. Preserve your draft before starting over.Completion check: a Stream run ID, a successful Route delivery log, and actual Destination receipt must match. See Webhook walkthrough and Logs evidence.
Last modified on October 18, 2026
{"docsConfig":{"theme":"mint","$schema":"https://mintlify.com/docs.json","name":"DataRelay Control","description":"Data delivery, route processing, protection, and operational control for enterprise data flows.","colors":{"primary":"#C2410C","light":"#FB923C","dark":"#C75A00"},"logo":{"light":"https://mintcdn.com/datarelay-control/tSouZfeXx238dWIU/logo/light.svg?fit=max\u0026auto=format\u0026n=tSouZfeXx238dWIU\u0026q=85\u0026s=dbaae21bf2f930ba9c91c5c6f56131d1","dark":"https://mintcdn.com/datarelay-control/tSouZfeXx238dWIU/logo/dark.svg?fit=max\u0026auto=format\u0026n=tSouZfeXx238dWIU\u0026q=85\u0026s=e2996dc158fb10355bb1f62a7c5ea1a7","href":"https://control.datarelay.run"},"favicon":"https://mintcdn.com/datarelay-control/tSouZfeXx238dWIU/favicon.svg?fit=max\u0026auto=format\u0026n=tSouZfeXx238dWIU\u0026q=85\u0026s=712ef0b5b0545ce5dea415ca5ef77cf9","appearance":{"default":"system","strict":false},"navbar":{"links":[{"href":"https://datarelay.run/","label":"DataRelay"},{"href":"https://link.datarelay.run/","label":"Link"},{"href":"https://control.datarelay.run/","label":"Control"},{"href":"https://grant.datarelay.run/","label":"Grant"},{"href":"https://engineering.datarelay.run/","label":"Engineering"},{"href":"https://github.com/datarelay-labs/datarelay-control","type":"github"}]},"search":{"prompt":"Search DataRelay Control docs..."},"seo":{"metatags":{"canonical":"https://control.datarelay.run"},"indexing":"navigable"},"metadata":{"timestamp":true},"styling":{"latex":false},"navigation":{"languages":[{"language":"en","href":""},{"language":"ko","href":"ko"}]}},"deployment":{"deploymentMetadataValue":{"subdomain":"datarelay-control","hasAudioNarration":false,"actualSubdomain":"datarelay-control","customDomains":["control.datarelay.run"],"gitSource":{"type":"github","owner":"datarelay-labs","repo":"datarelay-control-docs","deployBranch":"main","contentDirectory":"","isPrivate":false,"mountPath":"","label":""},"chroma":{"latestBuiltDeploymentHistoryId":"6ad4f6dd6410502f2e4657ca","collectionId":"3cd9860b-3224-48a0-9710-00991a4cf6c9","liveDeploymentHistoryId":"6ad4f6dd6410502f2e4657ca","schemaVersion":"v3"},"entitlements":{},"buildId":"6ad4f6dd6410502f2e4657ca","clientVersion":"0.0.4044","searchFilterCounts":[{"language":"en","tag":"Step-by-step Use Cases","count":17},{"language":"ko","tag":"활용 사례별 따라하기","count":17},{"language":"en","tag":"Reference","count":8},{"language":"ko","tag":"참고","count":8},{"language":"en","tag":"Getting Started","count":7},{"language":"ko","tag":"시작하기","count":7},{"language":"en","tag":"Operations","count":4},{"language":"ko","tag":"운영","count":4},{"language":"en","tag":"Administration","count":3},{"language":"ko","tag":"관리","count":3},{"language":"en","tag":"Deployment","count":2},{"language":"en","tag":"Processing \u0026 Governance","count":2},{"language":"en","tag":"Security","count":2},{"language":"ko","tag":"배포","count":2},{"language":"ko","tag":"처리 \u0026 Governance","count":2},{"language":"ko","tag":"보안","count":2},{"language":"en","tag":"Roadmap","count":1},{"language":"ko","tag":"로드맵","count":1}]},"assistantConfig":{"enableAskAiButton":false,"enableStarterQuestions":false,"enableContextualStarterQuestions":false,"enableAskAiSearchBar":true},"basePath":"","hasChatPermissions":false,"hasWebMcpPermissions":false,"toggles":[{"name":"kill-isr","enabled":true,"variant":{"name":"disabled","enabled":false,"feature_enabled":true},"impressionData":false},{"name":"agent-mintlify-slack","enabled":true,"variant":{"name":"disabled","enabled":false,"feature_enabled":true},"impressionData":false},{"name":"agent-integrations-settings","enabled":true,"variant":{"name":"disabled","enabled":false,"feature_enabled":true},"impressionData":false},{"name":"automations-pr-grouping","enabled":true,"variant":{"name":"disabled","enabled":false,"feature_enabled":true},"impressionData":false},{"name":"custom-prefix","enabled":true,"variant":{"name":"disabled","enabled":false,"feature_enabled":true},"impressionData":false},{"name":"analytics-v7","enabled":true,"variant":{"name":"disabled","enabled":false,"feature_enabled":true},"impressionData":false},{"name":"user-flows-analytics","enabled":true,"variant":{"name":"disabled","enabled":false,"feature_enabled":true},"impressionData":false},{"name":"no-publish-flow","enabled":true,"variant":{"name":"disabled","enabled":false,"feature_enabled":true},"impressionData":false},{"name":"workos-onboarding","enabled":true,"variant":{"name":"disabled","enabled":false,"feature_enabled":true},"impressionData":false},{"name":"llms-txt-v2","enabled":true,"variant":{"name":"disabled","enabled":false,"feature_enabled":true},"impressionData":false},{"name":"snapshot-serving-live","enabled":true,"variant":{"name":"disabled","enabled":false,"feature_enabled":true},"impressionData":false},{"name":"stripTemperatureMiddleware","enabled":true,"variant":{"name":"disabled","enabled":false,"feature_enabled":true},"impressionData":false},{"name":"support-platform-pylon-zendesk","enabled":true,"variant":{"name":"disabled","enabled":false,"feature_enabled":true},"impressionData":false},{"name":"snapshot-serving","enabled":true,"variant":{"name":"disabled","enabled":false,"feature_enabled":true},"impressionData":false},{"name":"instant-rollback","enabled":true,"variant":{"name":"disabled","enabled":false,"feature_enabled":true},"impressionData":false},{"name":"granular-notifications-server","enabled":true,"variant":{"name":"disabled","enabled":false,"feature_enabled":true},"impressionData":false},{"name":"granular-notifications","enabled":true,"variant":{"name":"disabled","enabled":false,"feature_enabled":true},"impressionData":false},{"name":"automations-fable","enabled":true,"variant":{"name":"disabled","enabled":false,"feature_enabled":true},"impressionData":false},{"name":"fixed-ai-action-pricing","enabled":true,"variant":{"name":"disabled","enabled":false,"feature_enabled":true},"impressionData":false},{"name":"automation-resolve-merge-conflict","enabled":true,"variant":{"name":"disabled","enabled":false,"feature_enabled":true},"impressionData":false},{"name":"scoped-publishing","enabled":true,"variant":{"name":"disabled","enabled":false,"feature_enabled":true},"impressionData":false},{"name":"mintql","enabled":true,"variant":{"name":"disabled","enabled":false,"feature_enabled":true},"impressionData":false},{"name":"page-level-analytics","enabled":true,"variant":{"name":"disabled","enabled":false,"feature_enabled":true},"impressionData":false},{"name":"editor-version-history-v2","enabled":true,"variant":{"name":"disabled","enabled":false,"feature_enabled":true},"impressionData":false},{"name":"billing-page-v2","enabled":true,"variant":{"name":"disabled","enabled":false,"feature_enabled":true},"impressionData":false},{"name":"full-page-search","enabled":true,"variant":{"name":"disabled","enabled":false,"feature_enabled":true},"impressionData":false},{"name":"workspace-projects","enabled":true,"variant":{"name":"disabled","enabled":false,"feature_enabled":true},"impressionData":false},{"name":"assistant-v5","enabled":true,"variant":{"name":"disabled","enabled":false,"feature_enabled":true},"impressionData":false},{"name":"byok-sep-25","enabled":true,"variant":{"name":"disabled","enabled":false,"feature_enabled":true},"impressionData":false},{"name":"fork-pr-previews","enabled":true,"variant":{"name":"disabled","enabled":false,"feature_enabled":true},"impressionData":false},{"name":"revalidation-jwt","enabled":true,"variant":{"name":"disabled","enabled":false,"feature_enabled":true},"impressionData":false},{"name":"vite-origin","enabled":true,"variant":{"name":"disabled","enabled":false,"feature_enabled":true},"impressionData":false},{"name":"billing-updated-9-15","enabled":true,"variant":{"name":"disabled","enabled":false,"feature_enabled":true},"impressionData":false},{"name":"workos-sso-scim","enabled":true,"variant":{"name":"disabled","enabled":false,"feature_enabled":true},"impressionData":false},{"name":"hobby-abuse-scan","enabled":true,"variant":{"name":"disabled","enabled":false,"feature_enabled":true},"impressionData":false},{"name":"dashboard-inbox","enabled":true,"variant":{"name":"disabled","enabled":false,"feature_enabled":true},"impressionData":false},{"name":"workos-signup","enabled":true,"variant":{"name":"disabled","enabled":false,"feature_enabled":true},"impressionData":false},{"name":"turbopuffer-dual-write","enabled":true,"variant":{"name":"disabled","enabled":false,"feature_enabled":true},"impressionData":false},{"name":"workos-enabled","enabled":true,"variant":{"name":"disabled","enabled":false,"feature_enabled":true},"impressionData":false},{"name":"approve-review-flow","enabled":true,"variant":{"name":"disabled","enabled":false,"feature_enabled":true},"impressionData":false},{"name":"sso-setup-deadline-banner","enabled":true,"variant":{"name":"disabled","enabled":false,"feature_enabled":true},"impressionData":false}],"googleFontsInlined":false},"customCss":[{"filePath":"style.css","content":":root{--dr-brand:#C2410C;--dr-brand-hover:#9A3412;--dr-brand-soft:#FFF7ED;--dr-product-accent:#047857;--dr-bg:#FFFFFF;--dr-surface:#FFFFFF;--dr-surface-subtle:#FAFAF9;--dr-ink:#1C1917;--dr-muted:#57534E;--dr-border:#E7E5E4;--dr-border-strong:#D6D3D1;--dr-shadow-sm:0 1px 2px rgb(28 25 23 / 0.05);--dr-shadow-md:0 14px 34px rgb(28 25 23 / 0.09);--dr-radius-sm:10px;--dr-radius-md:16px;--dr-radius-lg:24px}.dark{--dr-brand:#FB923C;--dr-brand-hover:#FDBA74;--dr-brand-soft:#2A160D;--dr-product-accent:#34D399;--dr-bg:#0C0A09;--dr-surface:#141210;--dr-surface-subtle:#1C1917;--dr-ink:#FAFAF9;--dr-muted:#C7C2BC;--dr-border:#292524;--dr-border-strong:#44403C;--dr-shadow-sm:0 1px 2px rgb(0 0 0 / 0.25);--dr-shadow-md:0 18px 42px rgb(0 0 0 / 0.32)}html{scroll-behavior:smooth}body{text-rendering:optimizeLegibility;-webkit-font-smoothing:antialiased}#navbar-transition{background:rgb(255 255 255/.9)!important;border-color:rgb(120 113 108/.16)!important;backdrop-filter:blur(16px) saturate(150%);-webkit-backdrop-filter:blur(16px) saturate(150%)}.dark #navbar-transition{background:rgb(12 10 9/.88)!important;border-color:rgb(231 229 228/.1)!important}.nav-logo{height:2rem!important}body,main h1,main h2{color:var(--dr-ink)}main h1{letter-spacing:-.038em;font-weight:760;line-height:1.08}main h2{letter-spacing:-.025em;font-weight:700}main h3{letter-spacing:-.015em}main li,main p{line-height:1.72}main blockquote{border-left:3px solid var(--dr-product-accent)!important;background:var(--dr-surface-subtle);border-radius:0 var(--dr-radius-sm) var(--dr-radius-sm) 0;padding:.8rem 1rem}main pre{border:1px solid var(--dr-border)!important;border-radius:var(--dr-radius-md)!important;box-shadow:var(--dr-shadow-sm)}main table{border-color:var(--dr-border)!important;border-radius:var(--dr-radius-sm)}.dr-hero-kicker{display:inline-flex;align-items:center;gap:.5rem;margin:0 0 1rem;padding:.42rem .7rem;border:1px solid #fed7aa;border-radius:999px;background:#fff7ed;color:#9a3412;font-size:.72rem;font-weight:760;letter-spacing:.12em;text-transform:uppercase}.dark .dr-hero-kicker{border-color:#7c2d12;background:#2a160d;color:#fdba74}.dr-hero-kicker+h1{max-width:950px;margin-top:0!important;font-size:clamp(2.7rem,6vw,4.85rem)!important;line-height:.98!important;letter-spacing:-.055em!important}.dr-hero-actions{display:flex;flex-wrap:wrap;gap:.7rem;margin:1.55rem 0 1.35rem}.dr-button{display:inline-flex;min-height:2.75rem;align-items:center;justify-content:center;border-radius:.72rem;padding:.68rem 1rem;border:1px solid transparent;font-size:.9rem;font-weight:680;line-height:1;text-decoration:none!important;transition:transform 150ms ease,border-color 150ms ease,background-color 150ms ease,box-shadow 150ms ease}.dr-button:hover{transform:translateY(-1px)}.dr-button-primary{background:var(--dr-brand);color:#fff!important;box-shadow:0 6px 18px rgb(194 65 12/.2)}.dr-button-primary:hover{background:var(--dr-brand-hover)}.dark .dr-button-primary{color:#1c1917!important}.dr-button-secondary{background:var(--dr-surface);color:var(--dr-ink)!important;border-color:var(--dr-border-strong);box-shadow:var(--dr-shadow-sm)}.dr-button-secondary:hover{border-color:var(--dr-product-accent)}.dr-family-strip{display:flex;align-items:center;gap:.35rem;margin:0 0 2rem;padding:.4rem;width:fit-content;max-width:100%;overflow-x:auto;border:1px solid var(--dr-border);border-radius:.85rem;background:var(--dr-surface-subtle);scrollbar-width:none}.dr-family-strip::-webkit-scrollbar{display:none}.dr-family-strip .dr-family-current,.dr-family-strip a{display:inline-flex;align-items:center;min-height:2rem;padding:.42rem .68rem;border-radius:.56rem;white-space:nowrap;color:var(--dr-muted)!important;font-size:.78rem;font-weight:650;text-decoration:none!important}.dr-family-strip a:hover{color:var(--dr-ink)!important;background:var(--dr-surface)}.dr-family-strip .dr-family-current{color:#fff!important;background:var(--dr-product-accent);box-shadow:var(--dr-shadow-sm)}.dark .dr-family-strip .dr-family-current{color:#0c0a09!important}.card{border-color:var(--dr-border)!important;border-radius:var(--dr-radius-md)!important;background:var(--dr-surface)!important;box-shadow:var(--dr-shadow-sm);transition:transform 160ms ease,box-shadow 160ms ease,border-color 160ms ease!important}.card:hover{transform:translateY(-2px);border-color:var(--dr-product-accent)!important;box-shadow:var(--dr-shadow-md)}[data-component-part=card-title]{letter-spacing:-.012em}[data-component-part=card-icon]{color:var(--dr-product-accent)!important}.callout{border-radius:var(--dr-radius-md)!important}footer{border-top-color:var(--dr-border)!important}:where(a, button, input, select, textarea):focus-visible{outline:3px solid var(--dr-product-accent)!important;outline-offset:3px!important}@media (max-width:768px){.dr-hero-kicker+h1{font-size:clamp(2.35rem,13vw,3.55rem)!important}.dr-hero-actions{display:grid;grid-template-columns:1fr}.dr-button,.dr-family-strip{width:100%}}@media (prefers-reduced-motion:reduce){html{scroll-behavior:auto}.card,.dr-button{transition:none!important}.card:hover,.dr-button:hover{transform:none}}"}],"page":{"pagePath":"use-cases/screen-walkthrough","slug":"/use-cases/screen-walkthrough","pageMetadata":{"title":"Follow the Stream Wizard with Screenshots","description":"Use numbered annotations on genuine Control test captures to select a Connector, test records, map fields, deploy and verify Logs.","href":"/use-cases/screen-walkthrough"},"description":{"compiledSource":"\"use strict\";\nconst {jsx: _jsx} = arguments[0];\nconst {useMDXComponents: _provideComponents} = arguments[0];\nfunction _createMdxContent(props) {\n const _components = {\n p: \"p\",\n ..._provideComponents(),\n ...props.components\n };\n return _jsx(_components.p, {\n children: \"Use numbered annotations on genuine Control test captures to select a Connector, test records, map fields, deploy and verify Logs.\"\n });\n}\nfunction MDXContent(props = {}) {\n const {wrapper: MDXLayout} = {\n ..._provideComponents(),\n ...props.components\n };\n return MDXLayout ? _jsx(MDXLayout, {\n ...props,\n children: _jsx(_createMdxContent, {\n ...props\n })\n }) : _createMdxContent(props);\n}\nreturn {\n default: MDXContent\n};\n","frontmatter":{},"scope":{}},"pageType":"default","mdx":{"mdxSource":{"compiledSource":"\"use strict\";const{Fragment:_Fragment,jsx:_jsx,jsxs:_jsxs}=arguments[0];const{useMDXComponents:_provideComponents}=arguments[0];function _createMdxContent(props){const _components={a:`a`,em:`em`,hr:`hr`,p:`p`,strong:`strong`,..._provideComponents(),...props.components},{Heading,OptimizedImage,Warning}=_components;if(!Heading)_missingMdxReference(`Heading`,true);if(!OptimizedImage)_missingMdxReference(`OptimizedImage`,true);if(!Warning)_missingMdxReference(`Warning`,true);return _jsxs(_Fragment,{children:[_jsx(Heading,{level:`1`,id:`follow-the-stream-wizard-with-screenshots`,children:`Follow the Stream Wizard with Screenshots`}),`\n`,_jsx(Warning,{children:_jsxs(_components.p,{children:[`These are `,_jsx(_components.strong,{children:`genuine historical Control UI test screenshots`}),`, cropped and numbered for explanation. They show an older `,_jsx(_components.strong,{children:`six-step Wizard`}),`, whereas the current product flow is `,_jsx(_components.strong,{children:`Connect → Sample \u0026 Record Selection → Destinations → Route Processing → Deploy`}),`. Follow the current UI’s sequence, not the old step numbering visible inside these captures. Screenshots are not proof of delivered events.`]})}),`\n`,_jsxs(_components.p,{children:[_jsx(_components.strong,{children:`Before you start:`}),` use `,_jsx(_components.a,{href:`/use-cases/index`,children:`connector-specific guides`}),` to prepare official API docs, least-privilege credentials, sanitized samples and a reachable Destination.`]}),`\n`,_jsx(Heading,{level:`2`,id:`1-select-the-saved-connector`,children:`1. Select the saved Connector`}),`\n`,_jsxs(_components.p,{children:[`Create the Connector first, then select it under `,_jsx(_components.strong,{children:`Connect`}),`. Verify the real Vendor/Source values.`]}),`\n`,_jsx(OptimizedImage,{src:`https://mintcdn.com/datarelay-control/Tl9_UibGAprPlCr8/images/screenshots/annotated/select-connector.webp?fit=max\u0026auto=format\u0026n=Tl9_UibGAprPlCr8\u0026q=85\u0026s=595bbed2cfdba81a0a246ed84116cc33`,alt:`select-connector — numbered Control historical UI capture`,\"data-og-width\":`1014`,width:`1014`,\"data-og-height\":`787`,height:`787`,\"data-path\":`images/screenshots/annotated/select-connector.webp`,\"data-optimize\":`true`,\"data-opv\":`3`,srcset:`https://mintcdn.com/datarelay-control/Tl9_UibGAprPlCr8/images/screenshots/annotated/select-connector.webp?w=280\u0026fit=max\u0026auto=format\u0026n=Tl9_UibGAprPlCr8\u0026q=85\u0026s=cb099509d4b58508899cebba9e696ad4 280w, https://mintcdn.com/datarelay-control/Tl9_UibGAprPlCr8/images/screenshots/annotated/select-connector.webp?w=560\u0026fit=max\u0026auto=format\u0026n=Tl9_UibGAprPlCr8\u0026q=85\u0026s=bd90e9c8752da8779121f2f8f4816ee2 560w, https://mintcdn.com/datarelay-control/Tl9_UibGAprPlCr8/images/screenshots/annotated/select-connector.webp?w=840\u0026fit=max\u0026auto=format\u0026n=Tl9_UibGAprPlCr8\u0026q=85\u0026s=c6ff0e9025bce9a1a7db16805d269128 840w, https://mintcdn.com/datarelay-control/Tl9_UibGAprPlCr8/images/screenshots/annotated/select-connector.webp?w=1100\u0026fit=max\u0026auto=format\u0026n=Tl9_UibGAprPlCr8\u0026q=85\u0026s=753f11cf2056ce308d26cd8dc6f418b0 1100w, https://mintcdn.com/datarelay-control/Tl9_UibGAprPlCr8/images/screenshots/annotated/select-connector.webp?w=1650\u0026fit=max\u0026auto=format\u0026n=Tl9_UibGAprPlCr8\u0026q=85\u0026s=e904f973e5d1b6b8b141c007b70e7217 1650w, https://mintcdn.com/datarelay-control/Tl9_UibGAprPlCr8/images/screenshots/annotated/select-connector.webp?w=2500\u0026fit=max\u0026auto=format\u0026n=Tl9_UibGAprPlCr8\u0026q=85\u0026s=90da4509d6bec5b9226a1f7b541db117 2500w`}),`\n`,_jsx(_components.p,{children:_jsxs(_components.em,{children:[`Figure 1. `,_jsx(_components.strong,{children:`Selecting an existing Connector.`}),` ① Select your saved Connector (Generic REST is a test example). ② Continue to Sample. The Connector tab is already active.`]})}),`\n`,_jsx(Heading,{level:`2`,id:`2-run-a-collection-test`,children:`2. Run a collection test`}),`\n`,_jsxs(_components.p,{children:[`Use `,_jsx(_components.strong,{children:`Run Test`}),` to fetch samples and inspect status/record count. A successful test does not auto-confirm the record path.`]}),`\n`,_jsx(OptimizedImage,{src:`https://mintcdn.com/datarelay-control/Tl9_UibGAprPlCr8/images/screenshots/annotated/run-test.webp?fit=max\u0026auto=format\u0026n=Tl9_UibGAprPlCr8\u0026q=85\u0026s=b608f03405b24c6b130a215599571177`,alt:`run-test — numbered Control historical UI capture`,\"data-og-width\":`1014`,width:`1014`,\"data-og-height\":`635`,height:`635`,\"data-path\":`images/screenshots/annotated/run-test.webp`,\"data-optimize\":`true`,\"data-opv\":`3`,srcset:`https://mintcdn.com/datarelay-control/Tl9_UibGAprPlCr8/images/screenshots/annotated/run-test.webp?w=280\u0026fit=max\u0026auto=format\u0026n=Tl9_UibGAprPlCr8\u0026q=85\u0026s=933e6f5facebed3c4620d8f54c02690d 280w, https://mintcdn.com/datarelay-control/Tl9_UibGAprPlCr8/images/screenshots/annotated/run-test.webp?w=560\u0026fit=max\u0026auto=format\u0026n=Tl9_UibGAprPlCr8\u0026q=85\u0026s=397710c98b680ce25938667d003585f1 560w, https://mintcdn.com/datarelay-control/Tl9_UibGAprPlCr8/images/screenshots/annotated/run-test.webp?w=840\u0026fit=max\u0026auto=format\u0026n=Tl9_UibGAprPlCr8\u0026q=85\u0026s=67c51f5a58e8599daff759c2deb8c950 840w, https://mintcdn.com/datarelay-control/Tl9_UibGAprPlCr8/images/screenshots/annotated/run-test.webp?w=1100\u0026fit=max\u0026auto=format\u0026n=Tl9_UibGAprPlCr8\u0026q=85\u0026s=265509aea86947ee0dc98162d26c53ee 1100w, https://mintcdn.com/datarelay-control/Tl9_UibGAprPlCr8/images/screenshots/annotated/run-test.webp?w=1650\u0026fit=max\u0026auto=format\u0026n=Tl9_UibGAprPlCr8\u0026q=85\u0026s=2e64351d38dbd5b0388d81bcf281e341 1650w, https://mintcdn.com/datarelay-control/Tl9_UibGAprPlCr8/images/screenshots/annotated/run-test.webp?w=2500\u0026fit=max\u0026auto=format\u0026n=Tl9_UibGAprPlCr8\u0026q=85\u0026s=23553a9b32271c53eb26a9f715de697a 2500w`}),`\n`,_jsx(_components.p,{children:_jsxs(_components.em,{children:[`Figure 2. `,_jsx(_components.strong,{children:`Testing collection and record count.`}),` ① Run Test → ② verify HTTP status and extracted record count → ③ open Record Selection. An HTTP success is not proof of Destination delivery.`]})}),`\n`,_jsx(Heading,{level:`2`,id:`3-confirm-record-path-and-checkpoint`,children:`3. Confirm record path and checkpoint`}),`\n`,_jsx(_components.p,{children:`Select the true event array in JSON Tree, then a reliable checkpoint field. Confirm suggestions; do not accept them blindly.`}),`\n`,_jsx(OptimizedImage,{src:`https://mintcdn.com/datarelay-control/Tl9_UibGAprPlCr8/images/screenshots/annotated/record-selection.webp?fit=max\u0026auto=format\u0026n=Tl9_UibGAprPlCr8\u0026q=85\u0026s=196de1ecaf541296095434008afc05ad`,alt:`record-selection — numbered Control historical UI capture`,\"data-og-width\":`1014`,width:`1014`,\"data-og-height\":`711`,height:`711`,\"data-path\":`images/screenshots/annotated/record-selection.webp`,\"data-optimize\":`true`,\"data-opv\":`3`,srcset:`https://mintcdn.com/datarelay-control/Tl9_UibGAprPlCr8/images/screenshots/annotated/record-selection.webp?w=280\u0026fit=max\u0026auto=format\u0026n=Tl9_UibGAprPlCr8\u0026q=85\u0026s=784444523c6df7cab01457f0103aad3e 280w, https://mintcdn.com/datarelay-control/Tl9_UibGAprPlCr8/images/screenshots/annotated/record-selection.webp?w=560\u0026fit=max\u0026auto=format\u0026n=Tl9_UibGAprPlCr8\u0026q=85\u0026s=a03b5ff8005abb6848b2e37a3b8ec15a 560w, https://mintcdn.com/datarelay-control/Tl9_UibGAprPlCr8/images/screenshots/annotated/record-selection.webp?w=840\u0026fit=max\u0026auto=format\u0026n=Tl9_UibGAprPlCr8\u0026q=85\u0026s=f80ee18d75dc4502eb4090a27d9c773e 840w, https://mintcdn.com/datarelay-control/Tl9_UibGAprPlCr8/images/screenshots/annotated/record-selection.webp?w=1100\u0026fit=max\u0026auto=format\u0026n=Tl9_UibGAprPlCr8\u0026q=85\u0026s=ba62ebf8a7e6bf1eba7c08e9c6807fdd 1100w, https://mintcdn.com/datarelay-control/Tl9_UibGAprPlCr8/images/screenshots/annotated/record-selection.webp?w=1650\u0026fit=max\u0026auto=format\u0026n=Tl9_UibGAprPlCr8\u0026q=85\u0026s=eae44710b552edff67a9a0a0511ee6de 1650w, https://mintcdn.com/datarelay-control/Tl9_UibGAprPlCr8/images/screenshots/annotated/record-selection.webp?w=2500\u0026fit=max\u0026auto=format\u0026n=Tl9_UibGAprPlCr8\u0026q=85\u0026s=9fe80cf9ada7bda5d2b37213b7a7f34e 2500w`}),`\n`,_jsx(_components.p,{children:_jsxs(_components.em,{children:[`Figure 3. `,_jsx(_components.strong,{children:`Choosing record path and checkpoint.`}),` ① Review the suggested Record Path, ② inspect actual fields in JSON Tree, ③ select the Checkpoint Field. This capture shows the not-yet-confirmed state.`]})}),`\n`,_jsx(Heading,{level:`2`,id:`4-verify-mapped-json-output`,children:`4. Verify mapped JSON output`}),`\n`,_jsxs(_components.p,{children:[`Compare Sample, Mapping and Preview in `,_jsx(_components.strong,{children:`Route Processing / Transform`}),`. Configure Route differences after selecting Destinations.`]}),`\n`,_jsx(OptimizedImage,{src:`https://mintcdn.com/datarelay-control/Tl9_UibGAprPlCr8/images/screenshots/annotated/field-mapping.webp?fit=max\u0026auto=format\u0026n=Tl9_UibGAprPlCr8\u0026q=85\u0026s=15ae79d8a5249262f236f997f253d286`,alt:`field-mapping — numbered Control historical UI capture`,\"data-og-width\":`1158`,width:`1158`,\"data-og-height\":`815`,height:`815`,\"data-path\":`images/screenshots/annotated/field-mapping.webp`,\"data-optimize\":`true`,\"data-opv\":`3`,srcset:`https://mintcdn.com/datarelay-control/Tl9_UibGAprPlCr8/images/screenshots/annotated/field-mapping.webp?w=280\u0026fit=max\u0026auto=format\u0026n=Tl9_UibGAprPlCr8\u0026q=85\u0026s=c046778f71012f135bb18e4cb3b0038c 280w, https://mintcdn.com/datarelay-control/Tl9_UibGAprPlCr8/images/screenshots/annotated/field-mapping.webp?w=560\u0026fit=max\u0026auto=format\u0026n=Tl9_UibGAprPlCr8\u0026q=85\u0026s=c682486e90940d6f43bf2630bcbd0ac0 560w, https://mintcdn.com/datarelay-control/Tl9_UibGAprPlCr8/images/screenshots/annotated/field-mapping.webp?w=840\u0026fit=max\u0026auto=format\u0026n=Tl9_UibGAprPlCr8\u0026q=85\u0026s=abafc4260e777e824d97a45efcfd77db 840w, https://mintcdn.com/datarelay-control/Tl9_UibGAprPlCr8/images/screenshots/annotated/field-mapping.webp?w=1100\u0026fit=max\u0026auto=format\u0026n=Tl9_UibGAprPlCr8\u0026q=85\u0026s=1fc5dd2a2a1cfec72ab47b26258d863d 1100w, https://mintcdn.com/datarelay-control/Tl9_UibGAprPlCr8/images/screenshots/annotated/field-mapping.webp?w=1650\u0026fit=max\u0026auto=format\u0026n=Tl9_UibGAprPlCr8\u0026q=85\u0026s=fb34429f07c89079e20207511489c28c 1650w, https://mintcdn.com/datarelay-control/Tl9_UibGAprPlCr8/images/screenshots/annotated/field-mapping.webp?w=2500\u0026fit=max\u0026auto=format\u0026n=Tl9_UibGAprPlCr8\u0026q=85\u0026s=fcb661e723293c3ebd94c4854cb5bf17 2500w`}),`\n`,_jsx(_components.p,{children:_jsxs(_components.em,{children:[`Figure 4. `,_jsx(_components.strong,{children:`Mapping an event to output fields.`}),` ① Inspect the source sample, ② configure Field Mapping, ③ compare Final Event Preview. A preview does not prove real delivery.`]})}),`\n`,_jsx(Heading,{level:`2`,id:`5-add-a-custom-field`,children:`5. Add a custom field`}),`\n`,_jsxs(_components.p,{children:[`If required, use `,_jsx(_components.strong,{children:`Add field → Static Value`}),`. Close the menu and verify the field appears in Preview.`]}),`\n`,_jsx(OptimizedImage,{src:`https://mintcdn.com/datarelay-control/Tl9_UibGAprPlCr8/images/screenshots/annotated/add-static-field.webp?fit=max\u0026auto=format\u0026n=Tl9_UibGAprPlCr8\u0026q=85\u0026s=d5f7d0d19193036e2aa71d7d4c4a6a62`,alt:`add-static-field — numbered Control historical UI capture`,\"data-og-width\":`737`,width:`737`,\"data-og-height\":`538`,height:`538`,\"data-path\":`images/screenshots/annotated/add-static-field.webp`,\"data-optimize\":`true`,\"data-opv\":`3`,srcset:`https://mintcdn.com/datarelay-control/Tl9_UibGAprPlCr8/images/screenshots/annotated/add-static-field.webp?w=280\u0026fit=max\u0026auto=format\u0026n=Tl9_UibGAprPlCr8\u0026q=85\u0026s=04b4b878b8465534d81d86e529ec6aca 280w, https://mintcdn.com/datarelay-control/Tl9_UibGAprPlCr8/images/screenshots/annotated/add-static-field.webp?w=560\u0026fit=max\u0026auto=format\u0026n=Tl9_UibGAprPlCr8\u0026q=85\u0026s=967bb9f1c8106222b33942094e4927ac 560w, https://mintcdn.com/datarelay-control/Tl9_UibGAprPlCr8/images/screenshots/annotated/add-static-field.webp?w=840\u0026fit=max\u0026auto=format\u0026n=Tl9_UibGAprPlCr8\u0026q=85\u0026s=46648349faea12ac558db026793f4af3 840w, https://mintcdn.com/datarelay-control/Tl9_UibGAprPlCr8/images/screenshots/annotated/add-static-field.webp?w=1100\u0026fit=max\u0026auto=format\u0026n=Tl9_UibGAprPlCr8\u0026q=85\u0026s=dbd8fc1338e83db664540b77a2ba32d3 1100w, https://mintcdn.com/datarelay-control/Tl9_UibGAprPlCr8/images/screenshots/annotated/add-static-field.webp?w=1650\u0026fit=max\u0026auto=format\u0026n=Tl9_UibGAprPlCr8\u0026q=85\u0026s=6c501ea58324f2dae3f6e3d3df81a0a9 1650w, https://mintcdn.com/datarelay-control/Tl9_UibGAprPlCr8/images/screenshots/annotated/add-static-field.webp?w=2500\u0026fit=max\u0026auto=format\u0026n=Tl9_UibGAprPlCr8\u0026q=85\u0026s=466dedda3c9e7d87e12043a7e1bf4fdd 2500w`}),`\n`,_jsx(_components.p,{children:_jsxs(_components.em,{children:[`Figure 5. `,_jsx(_components.strong,{children:`Adding a custom output field.`}),` ① Select Add field, ② choose Static Value, then ③ close the menu and verify the new field in Final Event Preview.`]})}),`\n`,_jsx(Heading,{level:`2`,id:`6-resolve-deploy-blockers`,children:`6. Resolve deploy blockers`}),`\n`,_jsxs(_components.p,{children:[`If `,_jsx(_components.strong,{children:`NEEDS ATTENTION`}),` appears, use `,_jsx(_components.strong,{children:`Edit`}),` for Data/Records, correct the problem and re-check readiness.`]}),`\n`,_jsx(OptimizedImage,{src:`https://mintcdn.com/datarelay-control/Tl9_UibGAprPlCr8/images/screenshots/annotated/deploy-readiness.webp?fit=max\u0026auto=format\u0026n=Tl9_UibGAprPlCr8\u0026q=85\u0026s=2eb8b8ba351102cfa1b039c59c529986`,alt:`deploy-readiness — numbered Control historical UI capture`,\"data-og-width\":`1015`,width:`1015`,\"data-og-height\":`907`,height:`907`,\"data-path\":`images/screenshots/annotated/deploy-readiness.webp`,\"data-optimize\":`true`,\"data-opv\":`3`,srcset:`https://mintcdn.com/datarelay-control/Tl9_UibGAprPlCr8/images/screenshots/annotated/deploy-readiness.webp?w=280\u0026fit=max\u0026auto=format\u0026n=Tl9_UibGAprPlCr8\u0026q=85\u0026s=0ece567ec3979debf7c42c4a11af44e9 280w, https://mintcdn.com/datarelay-control/Tl9_UibGAprPlCr8/images/screenshots/annotated/deploy-readiness.webp?w=560\u0026fit=max\u0026auto=format\u0026n=Tl9_UibGAprPlCr8\u0026q=85\u0026s=de51c4596aebf04d510b9242a80d77c5 560w, https://mintcdn.com/datarelay-control/Tl9_UibGAprPlCr8/images/screenshots/annotated/deploy-readiness.webp?w=840\u0026fit=max\u0026auto=format\u0026n=Tl9_UibGAprPlCr8\u0026q=85\u0026s=eaa3aff99e993b05d9d31358cf725db1 840w, https://mintcdn.com/datarelay-control/Tl9_UibGAprPlCr8/images/screenshots/annotated/deploy-readiness.webp?w=1100\u0026fit=max\u0026auto=format\u0026n=Tl9_UibGAprPlCr8\u0026q=85\u0026s=3fbf4465cd36cce11d20deab0c10235e 1100w, https://mintcdn.com/datarelay-control/Tl9_UibGAprPlCr8/images/screenshots/annotated/deploy-readiness.webp?w=1650\u0026fit=max\u0026auto=format\u0026n=Tl9_UibGAprPlCr8\u0026q=85\u0026s=fc569ca49ac4592866a334dfe3721bd7 1650w, https://mintcdn.com/datarelay-control/Tl9_UibGAprPlCr8/images/screenshots/annotated/deploy-readiness.webp?w=2500\u0026fit=max\u0026auto=format\u0026n=Tl9_UibGAprPlCr8\u0026q=85\u0026s=d2a21d5b692a9d33695514cf6f753de7 2500w`}),`\n`,_jsx(_components.p,{children:_jsxs(_components.em,{children:[`Figure 6. `,_jsx(_components.strong,{children:`Resolving a blocked deployment.`}),` ① Read NEEDS ATTENTION, ② use Edit on Data/Records to fix required inputs, ③ stop while the deployment button is disabled.`]})}),`\n`,_jsx(Heading,{level:`2`,id:`7-check-stream-runtime-after-creation`,children:`7. Check Stream runtime after creation`}),`\n`,_jsxs(_components.p,{children:[`After Stream creation, use `,_jsx(_components.strong,{children:`Start Stream`}),` and `,_jsx(_components.strong,{children:`View logs`}),` to confirm execution. This capture explicitly says `,_jsx(_components.strong,{children:`Runtime API unavailable`}),`.`]}),`\n`,_jsx(OptimizedImage,{src:`https://mintcdn.com/datarelay-control/Tl9_UibGAprPlCr8/images/screenshots/annotated/stream-actions.webp?fit=max\u0026auto=format\u0026n=Tl9_UibGAprPlCr8\u0026q=85\u0026s=f5462ebde85e05d0c95ab32096a1a24e`,alt:`stream-actions — numbered Control historical UI capture`,\"data-og-width\":`1014`,width:`1014`,\"data-og-height\":`655`,height:`655`,\"data-path\":`images/screenshots/annotated/stream-actions.webp`,\"data-optimize\":`true`,\"data-opv\":`3`,srcset:`https://mintcdn.com/datarelay-control/Tl9_UibGAprPlCr8/images/screenshots/annotated/stream-actions.webp?w=280\u0026fit=max\u0026auto=format\u0026n=Tl9_UibGAprPlCr8\u0026q=85\u0026s=5586a0d794e2faacd2098c0863522bee 280w, https://mintcdn.com/datarelay-control/Tl9_UibGAprPlCr8/images/screenshots/annotated/stream-actions.webp?w=560\u0026fit=max\u0026auto=format\u0026n=Tl9_UibGAprPlCr8\u0026q=85\u0026s=f9a219052d009f7977e4bd86e1e63106 560w, https://mintcdn.com/datarelay-control/Tl9_UibGAprPlCr8/images/screenshots/annotated/stream-actions.webp?w=840\u0026fit=max\u0026auto=format\u0026n=Tl9_UibGAprPlCr8\u0026q=85\u0026s=c9016cb3fc76cf38cbf90877cb01125f 840w, https://mintcdn.com/datarelay-control/Tl9_UibGAprPlCr8/images/screenshots/annotated/stream-actions.webp?w=1100\u0026fit=max\u0026auto=format\u0026n=Tl9_UibGAprPlCr8\u0026q=85\u0026s=384f3574c5de34d5ea0e06c276baa340 1100w, https://mintcdn.com/datarelay-control/Tl9_UibGAprPlCr8/images/screenshots/annotated/stream-actions.webp?w=1650\u0026fit=max\u0026auto=format\u0026n=Tl9_UibGAprPlCr8\u0026q=85\u0026s=fd8cb877beaf9b9e2301b748bcf27d76 1650w, https://mintcdn.com/datarelay-control/Tl9_UibGAprPlCr8/images/screenshots/annotated/stream-actions.webp?w=2500\u0026fit=max\u0026auto=format\u0026n=Tl9_UibGAprPlCr8\u0026q=85\u0026s=97e59d9006024c1baee6681676571b42 2500w`}),`\n`,_jsx(_components.p,{children:_jsxs(_components.em,{children:[`Figure 7. `,_jsx(_components.strong,{children:`Start and verify a newly created Stream.`}),` ① Review Stream creation, ② use Start Stream only when runtime is available, ③ open View logs to verify execution. This historical capture says Runtime API unavailable.`]})}),`\n`,_jsx(Heading,{level:`2`,id:`8-investigate-operational-health`,children:`8. Investigate operational health`}),`\n`,_jsx(_components.p,{children:`Inspect dashboard window, Health and Alerts; validate actual delivery through Route Logs and receiver data.`}),`\n`,_jsx(OptimizedImage,{src:`https://mintcdn.com/datarelay-control/Tl9_UibGAprPlCr8/images/screenshots/annotated/dashboard-triage.webp?fit=max\u0026auto=format\u0026n=Tl9_UibGAprPlCr8\u0026q=85\u0026s=f9c658cdeaa4638d8010ca10721745f1`,alt:`dashboard-triage — numbered Control historical UI capture`,\"data-og-width\":`1178`,width:`1178`,\"data-og-height\":`1083`,height:`1083`,\"data-path\":`images/screenshots/annotated/dashboard-triage.webp`,\"data-optimize\":`true`,\"data-opv\":`3`,srcset:`https://mintcdn.com/datarelay-control/Tl9_UibGAprPlCr8/images/screenshots/annotated/dashboard-triage.webp?w=280\u0026fit=max\u0026auto=format\u0026n=Tl9_UibGAprPlCr8\u0026q=85\u0026s=03500f26aa84591262fc2dd2d969aa9b 280w, https://mintcdn.com/datarelay-control/Tl9_UibGAprPlCr8/images/screenshots/annotated/dashboard-triage.webp?w=560\u0026fit=max\u0026auto=format\u0026n=Tl9_UibGAprPlCr8\u0026q=85\u0026s=8fc61ae540e829fde2ff7a48580a2029 560w, https://mintcdn.com/datarelay-control/Tl9_UibGAprPlCr8/images/screenshots/annotated/dashboard-triage.webp?w=840\u0026fit=max\u0026auto=format\u0026n=Tl9_UibGAprPlCr8\u0026q=85\u0026s=d94405ece9bf9ff69408da69299a5e1d 840w, https://mintcdn.com/datarelay-control/Tl9_UibGAprPlCr8/images/screenshots/annotated/dashboard-triage.webp?w=1100\u0026fit=max\u0026auto=format\u0026n=Tl9_UibGAprPlCr8\u0026q=85\u0026s=7709dbf2722cfa7602dde68100560164 1100w, https://mintcdn.com/datarelay-control/Tl9_UibGAprPlCr8/images/screenshots/annotated/dashboard-triage.webp?w=1650\u0026fit=max\u0026auto=format\u0026n=Tl9_UibGAprPlCr8\u0026q=85\u0026s=6bf4ecce28e617539e9badb9944e97bd 1650w, https://mintcdn.com/datarelay-control/Tl9_UibGAprPlCr8/images/screenshots/annotated/dashboard-triage.webp?w=2500\u0026fit=max\u0026auto=format\u0026n=Tl9_UibGAprPlCr8\u0026q=85\u0026s=15ea0d095365665f1c7950a72a288408 2500w`}),`\n`,_jsx(_components.p,{children:_jsxs(_components.em,{children:[`Figure 8. `,_jsx(_components.strong,{children:`Beginning an investigation on Dashboard.`}),` ① Set the time window, ② inspect Health/Critical, ③ use Recent Alerts for context. Verify the root cause in Streams, Routes and Logs.`]})}),`\n`,_jsx(Heading,{level:`2`,id:`failure-example-http-503-on-source-api-test`,children:`Failure example: HTTP 503 on Source API Test`}),`\n`,_jsxs(_components.p,{children:[`This is a `,_jsx(_components.strong,{children:`Source API Test failure`}),`, not a Destination error. Check vendor API status and configuration before retrying.`]}),`\n`,_jsx(OptimizedImage,{src:`https://mintcdn.com/datarelay-control/Tl9_UibGAprPlCr8/images/screenshots/annotated/source-api-error.webp?fit=max\u0026auto=format\u0026n=Tl9_UibGAprPlCr8\u0026q=85\u0026s=c66a05ef28da079c34e48a36ed217113`,alt:`source-api-error — numbered Control historical UI capture`,\"data-og-width\":`1014`,width:`1014`,\"data-og-height\":`553`,height:`553`,\"data-path\":`images/screenshots/annotated/source-api-error.webp`,\"data-optimize\":`true`,\"data-opv\":`3`,srcset:`https://mintcdn.com/datarelay-control/Tl9_UibGAprPlCr8/images/screenshots/annotated/source-api-error.webp?w=280\u0026fit=max\u0026auto=format\u0026n=Tl9_UibGAprPlCr8\u0026q=85\u0026s=883bd8836d885dae85a7fce5890937aa 280w, https://mintcdn.com/datarelay-control/Tl9_UibGAprPlCr8/images/screenshots/annotated/source-api-error.webp?w=560\u0026fit=max\u0026auto=format\u0026n=Tl9_UibGAprPlCr8\u0026q=85\u0026s=ae2c669515657bc6eebd71551aa33b1b 560w, https://mintcdn.com/datarelay-control/Tl9_UibGAprPlCr8/images/screenshots/annotated/source-api-error.webp?w=840\u0026fit=max\u0026auto=format\u0026n=Tl9_UibGAprPlCr8\u0026q=85\u0026s=cc2d8dd8d61d06408ed7c4e2ec82da29 840w, https://mintcdn.com/datarelay-control/Tl9_UibGAprPlCr8/images/screenshots/annotated/source-api-error.webp?w=1100\u0026fit=max\u0026auto=format\u0026n=Tl9_UibGAprPlCr8\u0026q=85\u0026s=b41ea35f8f6645832212b0aa0b83611f 1100w, https://mintcdn.com/datarelay-control/Tl9_UibGAprPlCr8/images/screenshots/annotated/source-api-error.webp?w=1650\u0026fit=max\u0026auto=format\u0026n=Tl9_UibGAprPlCr8\u0026q=85\u0026s=d3c9f88e1574b5f7839dc08926318a60 1650w, https://mintcdn.com/datarelay-control/Tl9_UibGAprPlCr8/images/screenshots/annotated/source-api-error.webp?w=2500\u0026fit=max\u0026auto=format\u0026n=Tl9_UibGAprPlCr8\u0026q=85\u0026s=ca8bd0e4d8dd279a9818ce394e0ada59 2500w`}),`\n`,_jsx(_components.p,{children:_jsxs(_components.em,{children:[`Figure 9. `,_jsx(_components.strong,{children:`HTTP 503 during Source API Test.`}),` ① Read the HTTP 503 error, ② repair the source and Retry, ③ do not proceed while blocked. This is a Source API Test failure, not a Destination failure.`]})}),`\n`,_jsx(Heading,{level:`2`,id:`optional-resume-a-saved-draft`,children:`Optional: resume a saved draft`}),`\n`,_jsxs(_components.p,{children:[`Use `,_jsx(_components.strong,{children:`Resume draft`}),` to continue retained settings. Only choose `,_jsx(_components.strong,{children:`Start fresh`}),` when you intend a new configuration.`]}),`\n`,_jsx(OptimizedImage,{src:`https://mintcdn.com/datarelay-control/Tl9_UibGAprPlCr8/images/screenshots/annotated/saved-draft.webp?fit=max\u0026auto=format\u0026n=Tl9_UibGAprPlCr8\u0026q=85\u0026s=92631991e209b6fc9696bf4e1adfe263`,alt:`saved-draft — numbered Control historical UI capture`,\"data-og-width\":`1015`,width:`1015`,\"data-og-height\":`221`,height:`221`,\"data-path\":`images/screenshots/annotated/saved-draft.webp`,\"data-optimize\":`true`,\"data-opv\":`3`,srcset:`https://mintcdn.com/datarelay-control/Tl9_UibGAprPlCr8/images/screenshots/annotated/saved-draft.webp?w=280\u0026fit=max\u0026auto=format\u0026n=Tl9_UibGAprPlCr8\u0026q=85\u0026s=d3285708b47c5dee03741c301486d1f2 280w, https://mintcdn.com/datarelay-control/Tl9_UibGAprPlCr8/images/screenshots/annotated/saved-draft.webp?w=560\u0026fit=max\u0026auto=format\u0026n=Tl9_UibGAprPlCr8\u0026q=85\u0026s=966cab48da0988707365266b005c56ce 560w, https://mintcdn.com/datarelay-control/Tl9_UibGAprPlCr8/images/screenshots/annotated/saved-draft.webp?w=840\u0026fit=max\u0026auto=format\u0026n=Tl9_UibGAprPlCr8\u0026q=85\u0026s=ca52088d75b98177c2c0f2eae8ed0f07 840w, https://mintcdn.com/datarelay-control/Tl9_UibGAprPlCr8/images/screenshots/annotated/saved-draft.webp?w=1100\u0026fit=max\u0026auto=format\u0026n=Tl9_UibGAprPlCr8\u0026q=85\u0026s=69809fa09c075836a3002d620285541d 1100w, https://mintcdn.com/datarelay-control/Tl9_UibGAprPlCr8/images/screenshots/annotated/saved-draft.webp?w=1650\u0026fit=max\u0026auto=format\u0026n=Tl9_UibGAprPlCr8\u0026q=85\u0026s=774614cdc3c98cc915d4416bb391a984 1650w, https://mintcdn.com/datarelay-control/Tl9_UibGAprPlCr8/images/screenshots/annotated/saved-draft.webp?w=2500\u0026fit=max\u0026auto=format\u0026n=Tl9_UibGAprPlCr8\u0026q=85\u0026s=67c61401872be6967306c58f1deea108 2500w`}),`\n`,_jsx(_components.p,{children:_jsxs(_components.em,{children:[`Figure 10. `,_jsx(_components.strong,{children:`Resuming a saved Wizard draft.`}),` ① Select Resume draft to continue existing settings or ② Start fresh for a new configuration. Preserve your draft before starting over.`]})}),`\n`,_jsx(_components.hr,{}),`\n`,_jsxs(_components.p,{children:[_jsx(_components.strong,{children:`Completion check:`}),` a Stream run ID, a successful Route delivery log, and `,_jsx(_components.strong,{children:`actual Destination receipt`}),` must match. See `,_jsx(_components.a,{href:`/use-cases/webhook-first-flow`,children:`Webhook walkthrough`}),` and `,_jsx(_components.a,{href:`/use-cases/logs-audit`,children:`Logs evidence`}),`.`]})]})}function MDXContent(props={}){const{wrapper:MDXLayout}={..._provideComponents(),...props.components};return MDXLayout?_jsx(MDXLayout,{...props,children:_jsx(_createMdxContent,{...props})}):_createMdxContent(props)}return{default:MDXContent};function _missingMdxReference(id,component){throw new Error(`Expected `+(component?`component`:`object`)+\" `\"+id+\"` to be defined: you likely forgot to import, pass, or provide it.\")}","frontmatter":{},"scope":{"config":{},"pageMetadata":{"title":"Follow the Stream Wizard with Screenshots","description":"Use numbered annotations on genuine Control test captures to select a Connector, test records, map fields, deploy and verify Logs.","href":"/use-cases/screen-walkthrough"}}},"mdxSourceWithNoJs":null},"mdxExtracts":{"tableOfContents":[{"title":"Follow the Stream Wizard with Screenshots","slug":"follow-the-stream-wizard-with-screenshots","depth":1,"children":[]},{"title":"1. Select the saved Connector","slug":"1-select-the-saved-connector","depth":2,"children":[]},{"title":"2. Run a collection test","slug":"2-run-a-collection-test","depth":2,"children":[]},{"title":"3. Confirm record path and checkpoint","slug":"3-confirm-record-path-and-checkpoint","depth":2,"children":[]},{"title":"4. Verify mapped JSON output","slug":"4-verify-mapped-json-output","depth":2,"children":[]},{"title":"5. Add a custom field","slug":"5-add-a-custom-field","depth":2,"children":[]},{"title":"6. Resolve deploy blockers","slug":"6-resolve-deploy-blockers","depth":2,"children":[]},{"title":"7. Check Stream runtime after creation","slug":"7-check-stream-runtime-after-creation","depth":2,"children":[]},{"title":"8. Investigate operational health","slug":"8-investigate-operational-health","depth":2,"children":[]},{"title":"Failure example: HTTP 503 on Source API Test","slug":"failure-example-http-503-on-source-api-test","depth":2,"children":[]},{"title":"Optional: resume a saved draft","slug":"optional-resume-a-saved-draft","depth":2,"children":[]}],"codeExamples":{}},"jsLinks":[],"subdomain":"datarelay-control","siteName":"DataRelay Control","title":"Follow the Stream Wizard with Screenshots - DataRelay Control","navMaps":{"firstHrefInVersion":{},"firstHrefInLanguage":{"en":{"href":"/use-cases/screen-walkthrough","matchLevel":0},"ko":{"href":"/ko/use-cases/screen-walkthrough","matchLevel":1}}},"lastModified":"2026-10-18T16:42:11.457Z","gitLastModified":"2026-10-18T16:42:01.000Z","originalFileLocation":"use-cases/screen-walkthrough.mdx","locale":"en"},"headHtml":"\u003cscript data-mint-head>(function(){var d=document.documentElement,p=null;if(!p){try{p=localStorage.getItem(\"isDarkMode\")}catch(e){}if(p==='true')p='dark';else if(p==='false')p='light';if(p!=='light'\u0026\u0026p!=='dark'\u0026\u0026p!=='system')p=\"system\"}var r=p==='system'?(matchMedia(\"(prefers-color-scheme: dark)\").matches?'dark':'light'):p;d.classList.remove(r==='dark'?'light':'dark');d.classList.add(r);d.setAttribute(\"data-theme-preference\",p)})();\u003c/script>\u003cmeta data-mint-head name=\"description\" content=\"Use numbered annotations on genuine Control test captures to select a Connector, test records, map fields, deploy and verify Logs.\">\u003cmeta data-mint-head name=\"application-name\" content=\"DataRelay Control\">\u003cmeta data-mint-head name=\"generator\" content=\"Mintlify\">\u003clink data-mint-head rel=\"icon\" type=\"image/png\" sizes=\"192x192\" href=\"/mintlify-assets/_mintlify/favicons/datarelay-control/Jay7lA66uQT7y97k/_generated/favicon/android-chrome-192x192.png\" media=\"(prefers-color-scheme: light)\">\u003clink data-mint-head rel=\"apple-touch-icon\" type=\"image/png\" sizes=\"180x180\" href=\"/mintlify-assets/_mintlify/favicons/datarelay-control/Jay7lA66uQT7y97k/_generated/favicon/apple-touch-icon.png\">\u003clink data-mint-head rel=\"icon\" type=\"image/png\" sizes=\"16x16\" href=\"/mintlify-assets/_mintlify/favicons/datarelay-control/Jay7lA66uQT7y97k/_generated/favicon/favicon-16x16.png\" media=\"(prefers-color-scheme: light)\">\u003clink data-mint-head rel=\"icon\" type=\"image/png\" sizes=\"32x32\" href=\"/mintlify-assets/_mintlify/favicons/datarelay-control/Jay7lA66uQT7y97k/_generated/favicon/favicon-32x32.png\" media=\"(prefers-color-scheme: light)\">\u003clink data-mint-head rel=\"shortcut icon\" type=\"image/x-icon\" href=\"/mintlify-assets/_mintlify/favicons/datarelay-control/Jay7lA66uQT7y97k/_generated/favicon/favicon.ico\" media=\"(prefers-color-scheme: light)\">\u003clink data-mint-head rel=\"icon\" type=\"image/png\" sizes=\"192x192\" href=\"/mintlify-assets/_mintlify/favicons/datarelay-control/Jay7lA66uQT7y97k/_generated/favicon-dark/android-chrome-192x192.png\" media=\"(prefers-color-scheme: dark)\">\u003clink data-mint-head rel=\"icon\" type=\"image/png\" sizes=\"16x16\" href=\"/mintlify-assets/_mintlify/favicons/datarelay-control/Jay7lA66uQT7y97k/_generated/favicon-dark/favicon-16x16.png\" media=\"(prefers-color-scheme: dark)\">\u003clink data-mint-head rel=\"icon\" type=\"image/png\" sizes=\"32x32\" href=\"/mintlify-assets/_mintlify/favicons/datarelay-control/Jay7lA66uQT7y97k/_generated/favicon-dark/favicon-32x32.png\" media=\"(prefers-color-scheme: dark)\">\u003clink data-mint-head rel=\"shortcut icon\" type=\"image/x-icon\" href=\"/mintlify-assets/_mintlify/favicons/datarelay-control/Jay7lA66uQT7y97k/_generated/favicon-dark/favicon.ico\" media=\"(prefers-color-scheme: dark)\">\u003cmeta data-mint-head property=\"og:title\" content=\"Follow the Stream Wizard with Screenshots - DataRelay Control\">\u003cmeta data-mint-head property=\"og:description\" content=\"Use numbered annotations on genuine Control test captures to select a Connector, test records, map fields, deploy and verify Logs.\">\u003cmeta data-mint-head property=\"og:site_name\" content=\"DataRelay Control\">\u003cmeta data-mint-head property=\"og:url\" content=\"https://control.datarelay.run/use-cases/screen-walkthrough\">\u003cmeta data-mint-head property=\"og:type\" content=\"website\">\u003cmeta data-mint-head property=\"og:image\" content=\"https://datarelay-control.mintlify.app/_mintlify/api/og/v2?division=Step-by-step+Use+Cases\u0026amp;title=Follow+the+Stream+Wizard+with+Screenshots\u0026amp;description=Use+numbered+annotations+on+genuine+Control+test+captures+to+select+a+Connector%2C+test+records%2C+map+fields%2C+deploy+and+verify+Logs.\u0026amp;theme=49091afdb5ce7328bec07c83\u0026amp;signature=6204a80b9be770e7305201b3b7c6ec4bf90d6505396f2598d4fd11133cb59da3\">\u003cmeta data-mint-head property=\"og:image:width\" content=\"1200\">\u003cmeta data-mint-head property=\"og:image:height\" content=\"630\">\u003cmeta data-mint-head name=\"twitter:card\" content=\"summary_large_image\">\u003cmeta data-mint-head name=\"twitter:title\" content=\"Follow the Stream Wizard with Screenshots - DataRelay Control\">\u003cmeta data-mint-head name=\"twitter:description\" content=\"Use numbered annotations on genuine Control test captures to select a Connector, test records, map fields, deploy and verify Logs.\">\u003cmeta data-mint-head name=\"twitter:image\" content=\"https://datarelay-control.mintlify.app/_mintlify/api/og/v2?division=Step-by-step+Use+Cases\u0026amp;title=Follow+the+Stream+Wizard+with+Screenshots\u0026amp;description=Use+numbered+annotations+on+genuine+Control+test+captures+to+select+a+Connector%2C+test+records%2C+map+fields%2C+deploy+and+verify+Logs.\u0026amp;theme=49091afdb5ce7328bec07c83\u0026amp;signature=6204a80b9be770e7305201b3b7c6ec4bf90d6505396f2598d4fd11133cb59da3\">\u003cmeta data-mint-head name=\"twitter:image:width\" content=\"1200\">\u003cmeta data-mint-head name=\"twitter:image:height\" content=\"630\">\u003cmeta data-mint-head name=\"msapplication-config\" content=\"/mintlify-assets/_mintlify/favicons/datarelay-control/Jay7lA66uQT7y97k/_generated/favicon/browserconfig.xml\">\u003cmeta data-mint-head name=\"apple-mobile-web-app-title\" content=\"DataRelay Control\">\u003cmeta data-mint-head name=\"msapplication-TileColor\" content=\"#C2410C\">\u003clink data-mint-head rel=\"canonical\" href=\"https://control.datarelay.run/use-cases/screen-walkthrough\">\u003clink data-mint-head rel=\"alternate\" type=\"application/xml\" href=\"/sitemap.xml\">\u003clink data-mint-head rel=\"alternate\" type=\"text/markdown\" href=\"/use-cases/screen-walkthrough.md\">\u003clink data-mint-head rel=\"alternate\" hreflang=\"en\" href=\"https://control.datarelay.run/use-cases/screen-walkthrough\">\u003clink data-mint-head rel=\"alternate\" hreflang=\"ko\" href=\"https://control.datarelay.run/ko/use-cases/screen-walkthrough\">\u003clink data-mint-head rel=\"alternate\" hreflang=\"x-default\" href=\"https://control.datarelay.run/use-cases/screen-walkthrough\">\u003cscript data-mint-head type=\"application/ld+json\">{\"@context\":\"https://schema.org\",\"@graph\":[{\"@type\":\"Organization\",\"@id\":\"https://control.datarelay.run/#organization\",\"name\":\"DataRelay Control\",\"url\":\"https://control.datarelay.run\",\"logo\":{\"@type\":\"ImageObject\",\"url\":\"https://mintcdn.com/datarelay-control/tSouZfeXx238dWIU/logo/light.svg?fit=max\u0026auto=format\u0026n=tSouZfeXx238dWIU\u0026q=85\u0026s=dbaae21bf2f930ba9c91c5c6f56131d1\"}},{\"@type\":\"WebSite\",\"@id\":\"https://control.datarelay.run#website\",\"name\":\"DataRelay Control\",\"url\":\"https://control.datarelay.run\",\"publisher\":{\"@id\":\"https://control.datarelay.run/#organization\"}},{\"@type\":\"WebPage\",\"@id\":\"https://control.datarelay.run/use-cases/screen-walkthrough#webpage\",\"url\":\"https://control.datarelay.run/use-cases/screen-walkthrough\",\"name\":\"Follow the Stream Wizard with Screenshots\",\"description\":\"Use numbered annotations on genuine Control test captures to select a Connector, test records, map fields, deploy and verify Logs.\",\"dateModified\":\"2026-10-18T16:42:01.000Z\",\"isPartOf\":{\"@id\":\"https://control.datarelay.run#website\"},\"breadcrumb\":{\"@id\":\"https://control.datarelay.run/use-cases/screen-walkthrough#breadcrumb\"}},{\"@type\":\"BreadcrumbList\",\"@id\":\"https://control.datarelay.run/use-cases/screen-walkthrough#breadcrumb\",\"itemListElement\":[{\"@type\":\"ListItem\",\"position\":1,\"name\":\"Step-by-step Use Cases\",\"item\":\"https://control.datarelay.run/use-cases/index\"},{\"@type\":\"ListItem\",\"position\":2,\"name\":\"Follow the Stream Wizard with Screenshots\",\"item\":\"https://control.datarelay.run/use-cases/screen-walkthrough\"}]},{\"@type\":[\"Article\",\"TechArticle\"],\"@id\":\"https://control.datarelay.run/use-cases/screen-walkthrough#article\",\"headline\":\"Follow the Stream Wizard with Screenshots\",\"name\":\"Follow the Stream Wizard with Screenshots\",\"description\":\"Use numbered annotations on genuine Control test captures to select a Connector, test records, map fields, deploy and verify Logs.\",\"url\":\"https://control.datarelay.run/use-cases/screen-walkthrough\",\"mainEntityOfPage\":{\"@id\":\"https://control.datarelay.run/use-cases/screen-walkthrough#webpage\"},\"dateModified\":\"2026-10-18T16:42:01.000Z\",\"publisher\":{\"@id\":\"https://control.datarelay.run/#organization\"},\"isPartOf\":{\"@id\":\"https://control.datarelay.run#website\"}}]}\u003c/script>\u003cscript data-mint-head type=\"application/ld+json\">{\"@context\":\"https://schema.org\",\"@type\":\"WebSite\",\"name\":\"DataRelay Control\",\"creator\":{\"@type\":\"Organization\",\"name\":\"Mintlify\",\"url\":\"https://mintlify.com\"}}\u003c/script>","siteName":"DataRelay Control","nav":{"global":null,"languages":[{"language":"en","groups":[{"group":"Getting Started","icon":"rocket","pages":[{"title":"DataRelay Control","href":""},{"title":"Overview","href":"/getting-started/overview"},{"title":"Architecture","href":"/getting-started/architecture"},{"title":"Quick Start","href":"/getting-started/quickstart"},{"title":"First Login","href":"/getting-started/first-login"},{"title":"First Stream","href":"/getting-started/first-stream"},{"title":"DataRelay Link Relationship","href":"/getting-started/data-relay-link"}]},{"group":"Step-by-step Use Cases","icon":"book","pages":[{"title":"Hands-on Use Cases","description":"Complete, outcome-oriented DataRelay Control walkthroughs with inputs, UI actions, success checks, and recovery.","href":"/use-cases/index"},{"title":"Follow the Stream Wizard with Screenshots","href":"/use-cases/screen-walkthrough"},{"title":"Prepare a Safe Lab","description":"Set up a local test receiver and reproducible synthetic event before trying the workflows.","href":"/use-cases/lab-setup"},{"title":"Webhook to First Delivered Event","href":"/use-cases/webhook-first-flow"},{"title":"Collect from an HTTP API","href":"/use-cases/http-api"},{"title":"Collect Events from PostgreSQL","href":"/use-cases/postgresql-collection"},{"title":"Collect Logs from S3 or MinIO","href":"/use-cases/s3-object-collection"},{"title":"Collect Files over SFTP","href":"/use-cases/sftp-file-collection"},{"title":"One Stream, Two Destinations","href":"/use-cases/multi-destination"},{"title":"Mask Data for Only One Route","href":"/use-cases/protect-pii"},{"title":"Handle Schema Changes","href":"/use-cases/schema-change"},{"title":"Quarantine, Review, and Replay","href":"/use-cases/quarantine-replay"},{"title":"Recover from a Delivery Failure","href":"/use-cases/delivery-incident"},{"title":"Find, Save, and Export Delivery Evidence","href":"/use-cases/logs-audit"},{"title":"Marketplace Package to Running Stream","href":"/use-cases/marketplace-install"},{"title":"Deliver Events to a Syslog Receiver","href":"/use-cases/syslog-delivery"},{"title":"Daily Operations Checklist","href":"/use-cases/daily-operations"}]},{"group":"Administration","icon":"gear","pages":[{"title":"Administration","href":"/administration/overview"},{"title":"Users \u0026 Roles","href":"/administration/users-roles"},{"title":"Connectors \u0026 Marketplace","href":"/administration/connectors-marketplace"}]},{"group":"Processing \u0026 Governance","icon":"route","pages":[{"title":"Route Processing","href":"/processing/route-processing"},{"title":"Governance","href":"/governance/overview"}]},{"group":"Operations","icon":"screwdriver-wrench","pages":[{"title":"Operations","href":"/operations/overview"},{"title":"Backup \u0026 Restore","href":"/operations/backup-restore"},{"title":"Upgrades","href":"/operations/upgrades"},{"title":"Troubleshooting","href":"/operations/troubleshooting"}]},{"group":"Deployment","icon":"server","pages":[{"title":"Deployment Requirements","href":"/deployment/requirements"},{"title":"Network, Reverse Proxy \u0026 TLS","href":"/deployment/network-tls"}]},{"group":"Security","icon":"shield-halved","pages":[{"title":"Security Overview","href":"/security/overview"},{"title":"Authentication \u0026 Authorization","href":"/security/authentication-authorization"}]},{"group":"Reference","icon":"book","pages":[{"title":"Configuration","href":"/reference/configuration"},{"title":"API Reference","href":"/reference/api"},{"title":"CLI \u0026 Operator Tools","href":"/reference/cli-tools"},{"title":"Data Model","href":"/reference/data-model"},{"title":"Release Status","href":"/reference/release-status"},{"title":"Known Limitations","href":"/reference/limitations"},{"title":"License","href":"/reference/license"},{"title":"Glossary","href":"/reference/glossary"}]},{"group":"Roadmap","icon":"map","pages":[{"title":"Current Status \u0026 Roadmap","href":"/roadmap/current-status"}]}]},{"language":"ko","pages":[{"title":"ko","href":"/ko/use-cases/screen-walkthrough"}]}]},"basePath":"","title":"Follow the Stream Wizard with Screenshots - DataRelay Control","buildId":"dpl_DeHjVRGfFnhYQwHnfC2pjeXXv8h9","deploymentId":"dpl_DeHjVRGfFnhYQwHnfC2pjeXXv8h9","dynamics":["a74be98ba7"],"chunks":["zoom-image-lightbox-BG6oD64b.js","lightbox-handle-r17bVUz3.js"]}